Parrot Bebop 1 Battery Balance Port

The Parrot Bebop 1 LiPo battery can be charged with a much better balance charger than the stock charger. To do so only requires a couple of connections for a B1 battery to hookup to an typical LiPo Balance Charger. The battery has the required ports just not in the typical locations or using the typical connectors. The B1 battery's balance port is embedded into the battery enclosure above the main power output connector. Those 4-golden contacts require a special balance connector. Reaching them in some way is needed in order to use an aftermarket balance charger. A few options exist to make the connections. One is already in your junk pile...I'll explain...
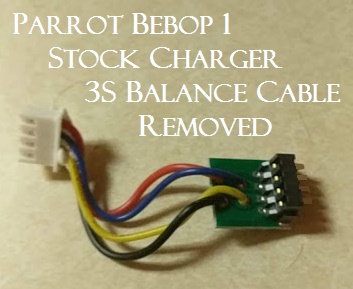
The easiest, quickest, and cheapest route to the balance port is to use a part from the stock charger..hey, it saves $5-$10 and repurposes a hunk of junk. You might think it's a sacrifice..but the stock charger isn't healthy for any LiPo investment anyway. So, hack it open and remove a little bit of its guts. That is a picture of the 3S 4-wire balance cable removed from the stock charger. This is the part needed to connect between the new charger and the battery's 4-golden contacts for balance charging and to LiPo checkers to measure the individual voltages of the 3 internal cells. The pics below will help you hack the part out.

 Start with 2 screws under the bottom corners of the stock charger's back label. Some rubber glue is holding components in place..just carefully remove the glue until you free the parts. Separate the halves and disconnect the 4-wire connector without damaging the wires. The rest of the disassembly is just a matter of removing more rubber glue and parts until the little adapter is free from the stock charger.

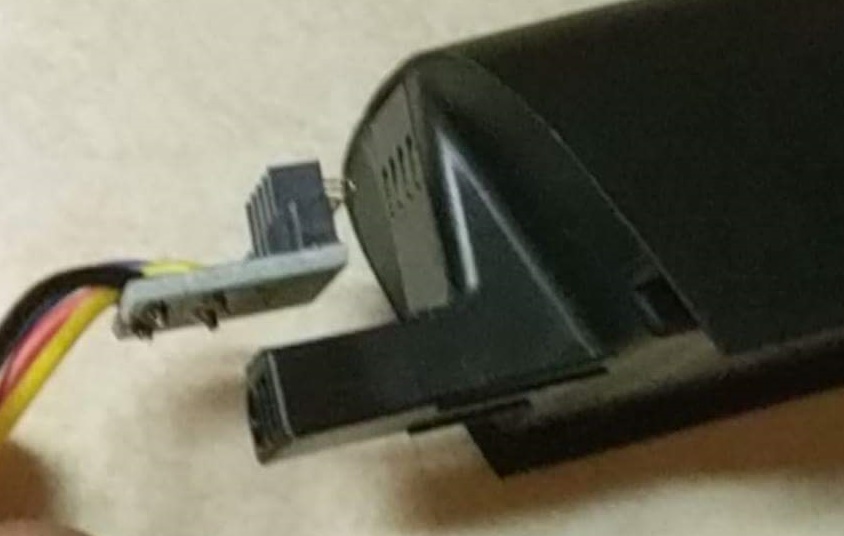
Once free from the stock charger..the little adapter requires a secure connection to the 4-golden contacts of the battery before charging. Several ways to position the connectors could be developed to accomplish a firm connection. Hot Glue is a great filler. Part of the stock charger's shell could be used as a tray or to fabricate a special connector for quick and secure connections. The little balance adapter can be stacked on top of the mini-Tamiya connector for the main power connection..as in a picture below. The mini-Tamiya has a lock-clip that can be snipped off to make some room and disconnections easier. Sometimes the springs and 4-golden contacts may need cleaning to make a perfect connection.
 The final configuration can look like this: (this example is by Jimmy Thompson)
 Option #2 to reach the 4-golden contacts of the balance port requires some time, money., and a bit of luck..since the ready-made part is becoming rare. This Anbee/YX Bebop Charge Adapter Tray/Plate is/was available at Amazon, eBay, and other online shops for about $5. It is usually sold-out in every place other than China..so be prepared to dig for it and wait for it to arrive. It is a structurally stable setup and is worth the price and wait. So, the stock charger's balance adapter might be the best route..but, this jig works very well and can also be used with a LiPo checker to quickly measure voltages.
  It is very important to connect both the main Black/Red power port leads and the Balance lead to the charger to properly 'Balance Charge' multi-cell LiPo packs such as the Bebop 1 3S (3-cell) battery. The charger must be set to 'Balance' charge..not just 'Charge' or 'Fast Charge' unless the charger is actually balancing with those settings.
 All LiPo multi-cell battery packs like the Bebop 1 require 'balance' charging to insure the internal cells (3 inside B1 packs) have the same amount of charge to supply the required voltages as needed during a flight. Some of Parrot's stock chargers have a few problems. Mainly, it does not show you the pack voltages or any other information about the battery or its health. Some stock chargers do not fully-charge a pack or balance the cells properly. I recommend finding a better battery charger and picking up a few habits that will make Bebop batteries last a looong time and live very productive lives. Several great balance chargers can provide far more therapy for expensive LiPo batteries. Give one a try and realize why saving expensive LiPo batteries will help the fun keep flying high.
If have a question add it in the comments!
Have Fun!
posted by Christopher R. Smith (Littlehorn) @ 1:52 AM
![]()

5 Comments:
Why not keep the Parrot charger plastic housing instead of making another mechanical connection to the battery? Keep the plastic housing the gold pin circuit board and ditch the rest of the charger electronics. Then make an adapter cable from the 4 pin assembly to a standard level charger.
Besides the tray..the stock charger shell is the best way actually. At the time of this post I had sold all of my B1 stock chargers. I did get a another with intentions of making what you have described. But, spent time making other stuff. I always use a tray and just posted this to help users that couldn't find a tray. The trays were hard to find for a while.
That's what i did. I cut a space out for the mini tamiya connection cable to go in and just seated the gold pins board exactly were it was seated in the parrot charger. The batteries just lock into the holder giving you direct and proper alignment with the pins. Much safer and also easier to use. Just plug n play no fiddling about.
Same original Bebop 1 batteries some months ago were giving around 9 minutes flight time. Now these have a flight time of 6:30. Recently, I purchased a good ISDT charger and after modding the original charger plug I can balance charge the batteries to 12.60V. When I get the warning in FFPro (9%) the batteries are around 3.80V. Is that OK? Batteries are a little bit curvy at the bottom side. Is that a sign of swollen? Thanks
Loved reading tthis thanks
Post a Comment
<< Home